6.14.2010

I'm still cooking.

Hi.  You'll notice I haven't posted since Easter.  Sorry.  Believe me, I have been cooking since then.  I have tried some new recipes too, but life has been hectic.  Sitting down to blog has slipped way down on the "to do" list--so far down that it doesn't get done!

In addition, one of my most frequent source of new recipes was the Kraft Foods magazine.  When I first started receiving it a few years ago, it was free.  It is no longer, and I didn't pay to continue my subscription.  So one source of recipes to tell you about is gone.

Also, I started receiving Taste of Home magazine a few months ago.  I have tried some recipes from it, but I am unable to link to those recipes for you on this site.  Their site only allows current subscribers to the magazine to have access to the recents months' recipes.  I'm not going to tell you about a recipe and then not give it to you, and I think there are copyright laws that prevent me from typing it in here when they go to such lengths to make those recipes only for their readers.  Sorry.

I am continuing to do cake, cookie and cupcake decorating, and I am chewing on ways to put the photos of those things on some sort of online gallery.  Once I figure out how I want to do it, I will let you all know how to get to it.

So, with all the changes our family has been going through lately with school schedules, the boys getting older, my commitments and my husband's commitments, blogging has slipped very far down my list of priorities.  I gave it a go for a while, and honestly, not that many people were visiting my blog.  I'm not a natural blogger like Ree Drummond, The Pioneer Woman.  My ramblings aren't nearly as interesting and entertaining.  haha.  So, this is likely my last post here on the Cookin' with Melissa blog.  For those of you who have tried some of the recipes and enjoyed seeing the cakes and cookies I made...

Thanks for stopping by!

4.04.2010

Wilton Level III Final Cake


In this post, I showed you the royal icing Easter Lilies I made to prepare for my final cake for the Level III Class. We completed our cakes on Wednesday night. We could take the cakes covered with fondant and finish them there. I made my own marshmallow fondant that I told you about here. It worked pretty well. At class, I assembled the two cakes, put on the garland and string work along with the ruffle along the bottom, and then placed the Easter Lilies. It was fun!

This cake didn't turn out as perfect as I had planned. I had more practice with all the others. Why would I make tiered cakes for practicing? Who needs that much cake? Anyway, I found out that royal icing works better for the garland and string work on the sides, and I was trying to do it with buttercream. My homemade fondant wasn't quite right, because I did something out of order when making it. (My 3-year old was in rare form that day. I think I was chasing him around the house every 30 seconds cleaning up his trail of messes. Hence, my attention span for my cake was not very long at any one point in the day. He didn't nap either. Grrrr.) Anyway, it's done.

Happy Easter! Thanks for stopping by!


4.03.2010

Jill's Cake


My sister has been telling me that she wants me to make her a cake now that I'm taking cake decorating classes. However, we will not be visiting at her birthday. When we were all at our parents' house last weekend, I baked her a cake. I took all my decorating supplies and tools along to PA so I could.

Jill likes bright, bold colors, and she wanted lots of flowers. Unfortunately, many of the flowers I've been making are royal icing flowers. They need to be made in advance and dried, and we just didn't have time. So, I just made her some buttercream flowers all over her cake. She picked different ideas from a bunch of different cakes out of my books, and I did whatever she wanted. This is how it turned out. Thanks for stopping by!

4.02.2010

Fondant!


Here are pictures from the third (last) class of the Level III Cake Decorating Course. The fourth class is always the one where we make our final cakes, so we don't learn new techniques at that one. At this one, we learned to work with fondant to cover cakes, make roses, and make lilies of the valley. I had an injured finger, so it was a little difficult for me to manipulate the fondant to make a nice rose. I'll have to practice it some more.


Fondant doesn't taste especially good, but I found a recipe on the Cake Central website where you make it from scratch with marshmallows.  I made some of the Marshmallow Fondant, and it tastes much better.  The trick is to get it the right consistency. I think it will work for covering cakes, but I'm not sure it's stiff enough for making roses. That's ok. I don't mind making the decorations with the Wilton Brand if I can cover the cake with the better tasting--and less expensive--stuff. Thanks for stopping by!

4.01.2010

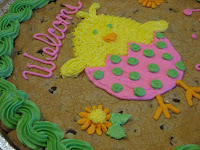
Welcome Spring! Jumbo Cookies


Shortly after making the St. Patrick's Day jumbo chocolate chip cookies, I decided they would be the perfect snack for my stamping workshop. I got these all made and ready, and then had to cancel the workshop.

I used an image from Stampin' Up! for the chick in the egg. It's fun to use the transfer technique using decorating gel with any king of image. I need to practice my writing technique. Thanks for stopping by!

3.31.2010

BIG Cupcake Daisies


I'm making assorted cupcakes for our church's spring ladies' retreat. I thought I'd make BIG flowers to put on the tops of them to distinguish the different flavors. I'm going to make big roses, pansies, and daffodils too. Here are the first big flowers, big daisies. They're about 3" in diameter. They were fun to make! I hope the rest of the flowers turn out ok too. We're going to put the cupcakes on cake pedestal plates in the middle of the tables as centerpieces. Hopefully, they'll look like big flower bouquets. Thanks for stopping by!

3.30.2010

Wilton Level III Final Cake Preparation


Once again, I am going to use a cake design from my course instruction booklet as my final cake. It uses petunias, but since this cake will be made the week before Easter, I'm going to use Easter Lilies instead. I started prepping them in advance so that they would have plenty of time to dry.


The cake will be a tiered cake, so I decided to make two sizes of Easter Lilies using the large and medium size lily nails in our class supply kit. I need ten of each size, but I made a dozen of each size in case one breaks or something. It's such a relief to have these done! Thanks for stopping by!

3.29.2010

Wilton Level III Cake Decorating Class

At my second Wilton Level III Cake Decorating Class, we made some more flowers using the lily nails. My royal icing was a little soft, so it didn't work as well as it should have. This was my first whack at petunias, morning glories, garlands and string work. Thanks for stopping by!


3.28.2010

Happy St. Patrick's Day Cookie


It's a little late, but this is a jumbo cookie that I made for the boys for St. Patrick's Day. I am having way too much fun with me new cake decorating skills. The perpetual supply of buttercream isn't such a good thing. I need to strengthen my will power against it.

One recipe of my chocolate chip cookie dough makes two of these jumbo cookies. We took one for my oldest son's kindergarten teacher on St. Patrick's Day. She thought it was great, and he was excited to give it to her. Thanks for stopping by!

3.25.2010

"16" Birthday Cake


A friend of mine saw my final cake--or at least the remnants of it--after I had taken it to the church office to get rid of the rest of it. (You can see it in yesterday's post.) Her son's 16th birthday was coming up, and she was thinking of doing a special cake for it. She asked me if I'd be interested, and I said, "Sure!"


They decided they would like a "16" shaped cake.  I started out with two 11x15 cakes made with 1 1/2 cake mixes each. The "1" is to have Oreo cream filling, and the "6" is to have buttercream filling. I probably could have done this with two 9x13 cakes and had enough servings, but I didn't want to be too small, and I wasn't sure how much cake I'd have to carve out to make the numbers.


I put this in the fridge to chill around 5pm and got it out around 12:30a to carve. I made a big "16" using a cool italic font on the computer, and then blew it up huge to the same size as my cake. I then used that as a pattern to carve my cake. You can see my templates and the excess cake that I cut away. There's a yummy use for cake scraps that I'll have to tell you about some other time.


So after carving the numbers, I decided they would be easier to ice if they were separated. I put them on two trays and iced them separately. Here they are with their crumb coats on. These chilled until the next evening when I decorated them with lime green and royal blue stripes. It was quite a job to get them on one board and completely decorated on the sides of the cakes against each other. Fun, fun!!  
 

Thanks for stopping by!

3.24.2010

Wilton Method Cake Decorating Class Level II Final Cake


Well, here's my final cake from the Level II Wilton Cake Decorating Course.  I finished the class on March 3rd.  I posted earlier about all the royal icing flowers I made to prepare for it.  This was the final product.  I was extremely pleased with the way that it turned out.  It was almost a shame to cut it, but we did.  I cut it for the ladies here at a stamping workshop later that week, and then I took the leftovers up to our church office to get rid of it.  I didn't need to sit and eat the rest of it myself, and none of the boys here liked it.


It was a fruity cake, a Pineapple Banana Smoothie cake from a Cake Doctor book.  Then, I used pineapple juice and pineapple flavoring in the buttercream.  To finish it off, there was pineapple filling between the layers.  I was a little concerned that it would be too much pineapple, but it wasn't.  It was really good. Thanks for stopping by!

3.23.2010

Chicken Korma II that I will never forget!

Sorry it's been so long since I've posted.  Life got busy there for a bit, and then when it slowed down, we lost our internet for a week.

A few weeks ago, I posted about trying a chicken korma recipe that was a disappointment.  My friend, Bobbie, emailed me with two chicken korma recipes that she had found online.  One recipe looked especially interesting and the most like what I've gotten at Indian restaurants when I order it.  Last week, I bought the ingredients to make it.

Last night, while I was cooking this Chicken Korma II dish, I had an accident.  I was getting ready to puree the cashews and yogurt, but my immersible blender attachment didn't seem to be working right.  Without thinking, I went to fiddle with the attachment without unplugging it.  The whole thing spun in my other hand, and somehow I pushed the power button.  Zwing!  The next thing I knew, my left hand was covered in blood oozing from my index finger.


I'll spare you all the details, but I went to the emergency room to get stitches.  I was lucky that the cut wasn't bigger.  I only needed four stitches, and I didn't cut any tendons/ligaments/bones.  It's doing pretty well today.  I have a HUGE pile of dishes that I must tackle with some rubber gloves once I take this big bandage off later this evening.

Back to the korma...  Before going to the hospital, I showed Jim what to do to finish the korma.  He finished it while I was at the emergency.  (My terrific friend, Sally, came and stayed with me and brought me home so that Jim could bring the boys home.)  I finally got to have some late last night, and it was wonderful!  I loved it!  I did add some golden raisins and sliced almonds at the end, which the recipe didn't call for, but it made it even better.  This one is definitely a keeper!

Come back again tomorrow.  I have a bunch of cake decorating pictures to show you from the past few weeks.  Thanks for stopping by!

3.02.2010

Lady and Son's Onion-Cheese Bread


I first tried this recipe a few years ago after seeing Paula Deen make it on her show. I forget about making breads as side dishes. Tonight, I remembered this recipe and made it to go with chicken stew for dinner.

I really enjoy this recipe for Lady and Son's Onion-Cheese Bread. I love sauteed onions on pizza, hamburgers, in French onion soup, and the list goes on. I've never made this in a round cake pan like the recipe calls for. Instead, I have made it in mini-muffin pans for bite-sized portions. Tonight, I made it in normal size muffin pans. Yum! Thanks for stopping by!

3.01.2010

Chicken Vindaloo

Jim and I really enjoy Indian food, but we don't go out for it nearly as often as we used to now that we have picky eaters in the family. Vindaloo is Jim's favorite dish, and I made this for him often.


I have no idea where I got this recipe originally. I found it years ago on a random Indian cooking website, I think. Since then, I have made my own adjustments to it. It's Jim's favorite Indian dish, so he has made some suggestions for improving it too. Here's the recipe:
Chicken Vindaloo


4 T. butter, divided
2 boneless, skinless chicken breasts
2 potatoes, peeled and diced
1-14 oz. can chicken broth
1/2 of a 29 oz. can of tomato puree
1 yellow onion, chopped
3 cloves garlic, diced or pressed
1 T. cider vinegar
curry/vindaloo paste
basmati rice


Melt 2 T. butter in large pan over medium high heat. Cut chicken into bite-size pieces and saute in butter until lightly browned and just cooked through. Remove chicken from pan and set aside.


Melt remaining 2 T. butter in pan. Add onions and garlic, fry for 2 min. over medium heat. Add 3-5 T. of curry (to taste) and fry for about 5 min. (I have been using vindaloo paste instead of curry. You can buy it at some grocery stores that stock ethnic foods. Jim likes this much better.)


Add chicken broth, potatoes and tomato puree. Cook for 10 min. over medium heat.


Add chicken back to pan. Reduce heat and simmer for 30 min. uncovered. Stir in cider vinegar and let sit 5 min. Serve over basmati rice.


Give this a whirl if you're feeling adventurous! Thanks for stopping by!

2.27.2010

More Colorful Flowers!


In class on Wednesday, we learned seven--yes, seven--new flowers. My icing was a little soft that evening and didn't hold its shape as well as it should have, so I won't show you those pictures.


In my last post, I showed you the violets and mums that I made with colored icing. Today, I'm going to show you the colored icing versions of the flowers we learned in class last week. This Wednesday is our Level II Course final class, so I'll be assembling my cake. I made up all these flowers so that they would be dry and ready to go on Wednesday.


First, I added the yellow accents to the violets...


Here are the daisies...


...apple blossoms...


...primroses...


...pansies...


...daffodils...


...rosebuds, which will look better wrapped with some leaves,...


...and Victorian roses. Its petals have a soft curl to them unlike the roses we made with buttercream a few weeks ago. A different tip adds this softness to the edges.

Come back later this week to see pictures of my finished cake! Thanks for stopping by!

2.25.2010

What a difference a little color makes!


Last week, I shared with you some pictures of the first flowers we made using royal icing instead of buttercream. I decided to go ahead and make the mums and violets for my final cake with some of the leftover icing. I colored my icing before making them. I have to say that adding a little color makes a huge difference, don't you think? These flowers will harden and be all ready for class next week when we make our final cake for the Level II Course. Thanks for stopping by!

2.24.2010

Lindley's Birthday Cake


I've been telling you about the preparations for this cake for two days. Today, I'm finally showing you the whole cake! The cake itself was pretty simple. The birthday girl requested vanilla cake with vanilla icing--even though I was fully prepared to make something coconut or pineapple inspired for the "Aloha!" theme.  Mmm, maybe I'll make something here at home like that just for me.

At any rate, here's the final cake for you to see.  The color flow pieces dried flat--not curved, so they aren't flush against the side of the cake.  Note to self: Dry sugar plaques on drying forms or only put them on the flat top of cakes from now on.

The flip flops are pretty cute, I think. Since they worked out well, I had two extra pair, so I sent them along with the cake for the girls to enjoy at the party. Lindley's mom said the first thing Lindley said to every girl that came in the door was, "Look at my cake!" She was very pleased with it, and that made me happy. Thanks for stopping by!

2.23.2010

Sugar Cookie Flip Flops


In yesterday's post I told you about a special birthday cake I made last week. In addition to it being an "Aloha!" themed cake, I found that flip flops were going to be involved. Her mom mentioned to me that the girls were going to be decorating their own flip flops at the party. Since I hadn't found much inspiration for a young girl's "Aloha!" party, flip flops seemed like better inspiration to me.  I went about looking for flip flop cakes. You would be surprised how many are out there!

I haven't learned how to use gum paste or fondant yet, or else maybe I would have used that to make flip flops instead. Or maybe I would have made big hibiscus flowers and never even thought about flip flops, but it's too late for that now.

I do know cookies! In fact, I decided to use a new roll out sugar cookie recipe that I just tried and posted about here. I traced around an old pair of my son's flip flops to get a pattern. I shrunk it a little to fit on my cake, cut it from cardstock and then traced around it with a knife in the sugar cookie dough. I made three pairs just in case something didn't work right, a little boy stuck his finger in one, the dog took a bite while I was picking my kid up at school, etc. Before baking, I used a drinking straw to make holes where I wanted to insert the licorice thongs later.

They turned out surprisingly well! I used scissors to trim the licorice pieces, using some royal icing for glue.  Then I flooded/covered them with color flow icing.  I knew it would give the smooth finish I wanted, and I wanted to use my extra up from class.  I didn't want it to go to waste, and I didn't have any other uses for it in mind. Stop by tomorrow to see the finished cake! Thanks for stopping by!

2.22.2010

Aloha! Color Flow Pieces


Wednesday was my birthday. Friends of ours have a daughter with the same birthday. Last year, I made her monogrammed cards. This year, I thought maybe I would offer to make her a birthday cake or cupcake or something. I talked to her mom a few weeks ago, and we decided I would make a cake for her birthday party.

Her party was going to be "Aloha!" themed with eight little girls in attendance. The birthday girl was going to turn ten. I started looking online for cakes with that theme, but wasn't very satisfied with what I found.  I'm picky. A lot of the cakes were for honeymooners or couple's anniversary parties, not for little girl's birthday parties.

After learning how to use color flow icing on Wednesday at class, I decided that's how I would incorporate the "Aloha!" theme into the flip flop cake. I searched online for some clip art to use, printed it, and made the sugar plaques, starting with outlining the images and then flooding the pieces with different colors of thinned icing.

I was concerned that the pieces wouldn't dry in time, so I made them thinner than normal and placed them in front of a small fan in my bathroom! Thankfully, they dried enough in time to finish the cake. Stop by tomorrow to see more of the cake preparations. Thanks for stopping by!
 

2.21.2010

Color Flow Icing Lesson I


On Wednesday evening, we also learned how to use color flow icing, which I had never even heard of before. (Read about our royal icing lesson in yesterday's post.) You use the icing to make sugar plaques that you can then place on cakes. Color flow icing is made with confectioner's sugar, color flow powder and water.


You start out with a line image that you want to copy. You place the image under a piece of waxed or parchment paper. Then, using stiff full strength color flow icing, you use a round tip to trace the linework of the image. These birds came from our Level II Course Instruction Booklet.

After completing the linework, you thin the icing with water and color it. You make it very runny so that it will "flood" the areas you wish to fill.  The full strength linework acts like a dam for the thinned icing.

I completed the blue parts at class and then brought them home to finish. It was easier to thin and color the icing in my own kitchen. They are now sitting in my laundry room drying on a cookie sheet.  They take quite a while to dry hard enough to pick up and place on a cake. These birds will be used on my final cake. Thanks for stopping by!

2.20.2010

Royal Icing Lesson I


My cake decorating class was cancelled two weeks ago due to weather.  When we met on Wednesday evening, we started working with two new types of icing:  royal icing and color flow icing.  I'll show you my color flow icing project tomorrow.


Royal icing is made with confectioner's sugar, meringue powder and water. Using the royal icing, we made two new types of flowers:  mums and violets. We learned how to make violet leaves too. If we want, we can make these flowers to use on our final cake for the Level II Course. When the royal icing dries, it's very hard, and you can simply pick the flowers up and place them on your cake.

I'm going to use my extra royal icing here at home to make more violets and mums. I'll color my icing and make them to be used on my final cake. Royal icing is much different than buttercream.  Unfortunately, it doesn't taste nearly as good.  Maybe I should work with royal icing more often so that I don't eat as much icing as I use to decorate! Thanks for stopping by!

2.18.2010

Chicken Korma

Jim and I really enjoy Indian food. I have even cooked it quite a bit. I have used a few different recipes over the years that have become favorites, and couple are good, but I would like to find better. My favorite Indian dish is any kind of korma: chicken, lamb, vegetable, it doesn't matter. I have not found a good korma recipe yet.

The current Taste of Home magazine has a short article in it with a few Indian recipes, one of which is Chicken Korma. I made it for dinner the other evening. It was a bit of a disappointment. It called for sour cream, annd I chose to use plain yogurt instead. Maybe the sour cream makes a huge difference, but to us it was really bland. I don't know if I'll try to make it again or not. I wish I could find a great korma recipe. If you have one, please let me know in a comment!

Since the recipe is in the current issue of Taste of Home, I can not link you through to it. It's only available to subscribers. Sorry. Thanks for stopping by!

2.17.2010

Dairy Queen Birthday Cake


My parents always come to visit in February, and while they're here, we celebrate my birthday. Since there have been so many cakes and cupcakes around here lately--a consequence of my cake decorating classes--they decided to take my two boys to Dairy Queen to pick out an ice cream cake for my birthday. I thought it was a pretty nifty idea the way they used ice cream cones on it, so I decided to share it here with you all. Thanks for stopping by!

2.15.2010

Windowpane Hearts--or whatevers


My oldest son wanted to make these Windowpane Heart cookies from Family Fun for Valentine's Day. I told him we would, but with the school Valentine's Day party and his grandparents visiting last weekend, we made them after Valentine's Day. Consequently, we decided not to make them heart-shaped, but used different cookie cutters instead.

I mixed them up on Saturday thinking that they would be fun to make with Grammy, but the weekend got busy, and we didn't get to it. The dough was in the fridge waiting for us, so we made them this afternoon after the grandparents left to go home. We were stuck indoors watching it snow, so it was a good snowy day activity.

The boys had fun helping to roll out the dough, and it wasn't messy, because the recipe tells you to roll it between two layers of waxed paper. I DO NOT enjoy making cut out cookies, but this was the best cut out cookie recipe I have used to date. I am pretty sure I will use it again to make normal cut out cookies to decorate with icing.

What makes this recipe special is that you bake the cookies on aluminum foil and fill the cut out centers with hard candy. Similar to the Family Fun recipe, we used Jolly Ranchers. The pieces were too big for our small openings, so I used a heavy knife to "whack" the pieces into halves on a cutting board. The boys liked dropping the pieces of candy into the little holes in the cookies too.


I can not even begin to tell you how pleased I am with the way these turned out. I did not have high hopes for them turning out anywhere near as pretty as the Family Fun shows them, but ours did! Yay! It's the little things in life, isn't it? The boys had fun and were so surprised at what they looked like when they came out of the oven. It was a fun baking day with the boys. Thanks for stopping by!