Showing posts with label Cakes and Icings. Show all posts

4.02.2010

Fondant!


Here are pictures from the third (last) class of the Level III Cake Decorating Course. The fourth class is always the one where we make our final cakes, so we don't learn new techniques at that one. At this one, we learned to work with fondant to cover cakes, make roses, and make lilies of the valley. I had an injured finger, so it was a little difficult for me to manipulate the fondant to make a nice rose. I'll have to practice it some more.


Fondant doesn't taste especially good, but I found a recipe on the Cake Central website where you make it from scratch with marshmallows.  I made some of the Marshmallow Fondant, and it tastes much better.  The trick is to get it the right consistency. I think it will work for covering cakes, but I'm not sure it's stiff enough for making roses. That's ok. I don't mind making the decorations with the Wilton Brand if I can cover the cake with the better tasting--and less expensive--stuff. Thanks for stopping by!

3.25.2010

"16" Birthday Cake


A friend of mine saw my final cake--or at least the remnants of it--after I had taken it to the church office to get rid of the rest of it. (You can see it in yesterday's post.) Her son's 16th birthday was coming up, and she was thinking of doing a special cake for it. She asked me if I'd be interested, and I said, "Sure!"


They decided they would like a "16" shaped cake.  I started out with two 11x15 cakes made with 1 1/2 cake mixes each. The "1" is to have Oreo cream filling, and the "6" is to have buttercream filling. I probably could have done this with two 9x13 cakes and had enough servings, but I didn't want to be too small, and I wasn't sure how much cake I'd have to carve out to make the numbers.


I put this in the fridge to chill around 5pm and got it out around 12:30a to carve. I made a big "16" using a cool italic font on the computer, and then blew it up huge to the same size as my cake. I then used that as a pattern to carve my cake. You can see my templates and the excess cake that I cut away. There's a yummy use for cake scraps that I'll have to tell you about some other time.


So after carving the numbers, I decided they would be easier to ice if they were separated. I put them on two trays and iced them separately. Here they are with their crumb coats on. These chilled until the next evening when I decorated them with lime green and royal blue stripes. It was quite a job to get them on one board and completely decorated on the sides of the cakes against each other. Fun, fun!!  
 

Thanks for stopping by!

3.24.2010

Wilton Method Cake Decorating Class Level II Final Cake


Well, here's my final cake from the Level II Wilton Cake Decorating Course.  I finished the class on March 3rd.  I posted earlier about all the royal icing flowers I made to prepare for it.  This was the final product.  I was extremely pleased with the way that it turned out.  It was almost a shame to cut it, but we did.  I cut it for the ladies here at a stamping workshop later that week, and then I took the leftovers up to our church office to get rid of it.  I didn't need to sit and eat the rest of it myself, and none of the boys here liked it.


It was a fruity cake, a Pineapple Banana Smoothie cake from a Cake Doctor book.  Then, I used pineapple juice and pineapple flavoring in the buttercream.  To finish it off, there was pineapple filling between the layers.  I was a little concerned that it would be too much pineapple, but it wasn't.  It was really good. Thanks for stopping by!

2.23.2010

Sugar Cookie Flip Flops


In yesterday's post I told you about a special birthday cake I made last week. In addition to it being an "Aloha!" themed cake, I found that flip flops were going to be involved. Her mom mentioned to me that the girls were going to be decorating their own flip flops at the party. Since I hadn't found much inspiration for a young girl's "Aloha!" party, flip flops seemed like better inspiration to me.  I went about looking for flip flop cakes. You would be surprised how many are out there!

I haven't learned how to use gum paste or fondant yet, or else maybe I would have used that to make flip flops instead. Or maybe I would have made big hibiscus flowers and never even thought about flip flops, but it's too late for that now.

I do know cookies! In fact, I decided to use a new roll out sugar cookie recipe that I just tried and posted about here. I traced around an old pair of my son's flip flops to get a pattern. I shrunk it a little to fit on my cake, cut it from cardstock and then traced around it with a knife in the sugar cookie dough. I made three pairs just in case something didn't work right, a little boy stuck his finger in one, the dog took a bite while I was picking my kid up at school, etc. Before baking, I used a drinking straw to make holes where I wanted to insert the licorice thongs later.

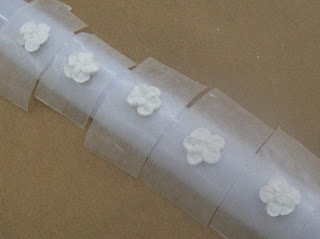
They turned out surprisingly well! I used scissors to trim the licorice pieces, using some royal icing for glue.  Then I flooded/covered them with color flow icing.  I knew it would give the smooth finish I wanted, and I wanted to use my extra up from class.  I didn't want it to go to waste, and I didn't have any other uses for it in mind. Stop by tomorrow to see the finished cake! Thanks for stopping by!
2.21.2010

Color Flow Icing Lesson I


On Wednesday evening, we also learned how to use color flow icing, which I had never even heard of before. (Read about our royal icing lesson in yesterday's post.) You use the icing to make sugar plaques that you can then place on cakes. Color flow icing is made with confectioner's sugar, color flow powder and water.


You start out with a line image that you want to copy. You place the image under a piece of waxed or parchment paper. Then, using stiff full strength color flow icing, you use a round tip to trace the linework of the image. These birds came from our Level II Course Instruction Booklet.

After completing the linework, you thin the icing with water and color it. You make it very runny so that it will "flood" the areas you wish to fill.  The full strength linework acts like a dam for the thinned icing.

I completed the blue parts at class and then brought them home to finish. It was easier to thin and color the icing in my own kitchen. They are now sitting in my laundry room drying on a cookie sheet.  They take quite a while to dry hard enough to pick up and place on a cake. These birds will be used on my final cake. Thanks for stopping by!

2.20.2010

Royal Icing Lesson I


My cake decorating class was cancelled two weeks ago due to weather.  When we met on Wednesday evening, we started working with two new types of icing:  royal icing and color flow icing.  I'll show you my color flow icing project tomorrow.


Royal icing is made with confectioner's sugar, meringue powder and water. Using the royal icing, we made two new types of flowers:  mums and violets. We learned how to make violet leaves too. If we want, we can make these flowers to use on our final cake for the Level II Course. When the royal icing dries, it's very hard, and you can simply pick the flowers up and place them on your cake.

I'm going to use my extra royal icing here at home to make more violets and mums. I'll color my icing and make them to be used on my final cake. Royal icing is much different than buttercream.  Unfortunately, it doesn't taste nearly as good.  Maybe I should work with royal icing more often so that I don't eat as much icing as I use to decorate! Thanks for stopping by!

1.27.2010

Wilton Level I Cake Decorating Class Final


I completed my Wilton Level I cake decorating class tonight! I had Jim take my picture with my cake and certificate when I got home.


Does this cake look familiar? It should, because it's the same as Sally's birthday cake I made earlier this week. It was a trial run for my final.  Sally's cake was coconut, but this one is a Devil's food cake with a chocolate ganache filling between the layers. Then, I made purple roses instead of blue. The instructor said it was beautiful. I can't wait to start Level 2 next week! I already have the kit for it and everything!

1.25.2010

Happy Birthday, Sally!


My friend, Sally, has a birthday today. I decided a few weeks ago I would surprise her with a birthday cake since I'm taking a cake decorating class. Sally's favorite color is blue, hence the blue roses. However, they're probably a little darker than I would like them to be.

The cake is a coconut cake that I made by using coconut milk in a white cake mix instead of water.  Have you seen the Cake Mix Doctor books? I sort of followed a recipe in the Cupcakes: From the Cake Mix Doctor cookbook, but made a layer cake instead of cupcakes. I should have added coconut flavoring to the cake mix and icing, but I didn't have any. I'll have to get some! There's a coconut filling in between the two layers that comes from a Paula Deen recipe for Jamie's Coconut Cake that I've used before.

This was a trial run of a cake for my Wilton Method Level I Cake Decorating class final on Wednesday evening. The design is from a sample cake in our Level I lesson book. There are little imperfections that I can see, of course, but it looks ok, I think. The consistency of the icing for the roses needs to be a little different, but other than that, I'm pretty pleased with it. Thanks for stopping by!

1.15.2010

Colts Cake


The past two days I have told you about my cake decorating class and the cakes I made for a church event. This is the second cake I made for the Men for Christ event at the church Monday evening. The speaker was the Colts Chaplain, and everyone at the church is excited about the Colts in the NFL playoffs right now.


I decided to make a Colts cake. This is a simple white cake made with a cake mix and made-from-scratch buttercream icing. I finally used clear vanilla and clear butter flavoring in my icing, and it does make a difference in how white it looks. This was a fun cake to practice my leveling and crumb coat application skills on. It was fun to put the Colts horseshoe on it too, although I need to buy a darker blue icing dye.

Since my beloved Pittsburgh Steelers are not in the playoffs this year, I guess I will cheer on the Colts. I do like Peyton Manning. He does all those goofy commercials and doesn't appear to take himself too seriously. He was also at Tennessee in the same years I was at Penn State, so I feel like he's the same age as me and I've "known" him for a while.

Thanks for stopping by!

1.14.2010

German Chocolate Cake


Our church hostes a Men for Christ meeting Monday evening. The women of the church were asked to donate pies and cakes for the event. I signed up to bring two cakes--before I decided on a whim to take a cake decorating class. After having my first class last Wednesday, I decided to practice with the two cakes I would make for the church. I just practiced the basics with them:  leveling them, putting on a crumb coat, and simple star tip decorating.

I have never made a German chocolate cake before. I used a chocolate cake mix for the cake, but made both icings from scratch. The Coconut-Pecan Frosting was from my Better Homes & Gardens binder cookbook. Thanks for stopping by!

1.13.2010

Wilton Method Cake Decorating Class Level I


I'm taking a cake decorating class. Last November when I made my youngest son's birthday cake, I was disappointed with the way it turned out. I took a simple cake decorating class in 4H when I was in junior high, but I wanted to learn more than what I already knew. I thought to myself that I should take a cake decorating class to learn how to do it better. I mentioned it to my husband and my sister, and they both encouraged me to do it.

Last Monday, we were just back from being in PA, and my house looked like a tornado had gone through it. Instead of unpacking us and getting us settled back in, I decided to look online for local places that give cake decorating classes. I made some phone calls, and found a Michael's store with a Wilton Level I class that was starting last week. There was still time to register, so I had my hubby stop on his way home and sign me up.

Last Wednesday evening was our first class. We learned about leveling and torting cakes, icing consistencies, how to put on a crumb coat and other various beginner's skills and techniques. Our teacher, Jackie, brought each of us a little carrot cake to practice on. This is the cake from my first night.

1.10.2010

Aquarium Birthday Cake


I mentioned yesterday that my oldest son's birthday was Friday. He got a small aquarium for his birthday. To continue the theme, I made this cake for him. He really likes Swedish fish, so that was an added bonus. Thanks for stopping by!

1.09.2010

'10 Birthday Cupcakes


Yesterday was my oldest son's 6th birthday. He wanted me to bring cupcakes in for his class. We talked about what kind of cupcakes he wanted, and how he wanted them decorated. He got a red gumball machine for Christmas. He really likes it, and we decided to put gumball machines on his cupcakes.


I used a plastic milk jug cap to make a circular imprint in the white buttercream icing. Then I traced the imprint with the light blue icing for the globe of the gumball machine. The rest is just free-handed. The kids really liked them and thought the gumball machines were cute. Thanks for stopping by!

9.01.2009

Chocolate-Sour-Cream Frosting

Yesterday I told you about some brownies I made from scratch. Here's the recipe for the Chocolate-Sour-Cream Frosting that I added to them to make them even more decadent than they were on their own! Can you tell I was really craving chocolate last week? This recipe is another oldie but goodie from that red and white plaid binder Better Homes & Garden Cookbook that almost everyone owns.

Chocolate-Sour-Cream Frosting

1 c. semisweet chocoate pieces
1/4 c. margarine or butter
1/2 c. dairy sour cream
2 1/2 c. sifted powdered sugar

In a saucepan melt chocolate and margarine over low heat, stirring frequently. Cool about 5 minutes. Stir in sour cream. Gradually add powdered sugar, beating till smooth and of spreading consistency. Frosts top and sides of two 8- or 9-inch cake layers. Store cake in refrigerator.
Thanks for stopping by!

7.01.2009

Father's Day Cake

One of the special things the boys and I did for Jim for Father's Day was to bake him a cake. I've seen those 9x13 cakes made up to look like a dress shirt and tie, so we did something similar. We made him one to look like a football official's shirt--or at least something close to it! I am by no means a great cake decorator, but I took some lessons as a kid in 4H. It's enough to get me by on some cakes for our family's special days.


A few weeks ago, we bought a cake to take to some friends' place while we were on vacation. It was a sheet cake, but they had split it in half and put a layer of icing in between. I've never seen that done to a 9x13 cake before. I decided to try it. We made a chocolate cake and put an Oreo cookie cream filling inside--to keep with the black and white theme, of course!

The cake tasted fantastic, and the decorating was ok. It's hard to get nice straight stripes! I had black decorator's dye here, so I was able to get a pretty dark gray icing for the shirt. I had it all finished and in the basement fridge. In the afternoon, the boys were playing in the basement. My 2-year old decided to "play" in the cake instead. There were little tiny finger holes poked all through the bottom of the shirt! I guess that was his way of adding his signature to the gift. Thanks for stopping by!

3.30.2009

Texas Coconut Pecan Cake

One of the ladies at church made this cake for a Wednesday night meal a few weeks ago. Many of us asked her for the recipe, and she was kind enough to bring it to the church office to copy it for many of us. I decided to make it for my Wednesday night meal. I don't think she'll mind if I share it. Thanks, Carole, for the recipe!

Texas Coconut Pecan Cake

1 yellow cake mix
1 can coconut pecan frosting

Mix cake mix batter as directed on box. Mix frosting in with batter, beat well with mixer. Bake in a prepared bundt pan at 350F for 45 minutes or until done. Allow to cool for about 10 min. before removing from pan.

Sauce:

Cook 4 T. brown sugar, 1/4 c. butter, and 1/4 c. heavy cream in a small saucepan over medium heat until thick and bubbly. Drizzle over hot cake.
Thanks for stopping by!

3.27.2009

Texas Sheet Cake

This recipe is from my mother-in-law. She makes this cake every year for the Toth family reunion, so I called her last week for the recipe. It's a very simple one. Thanks, Becky, for the recipe!

Texas Sheet Cake

Preheat oven to 375. Lightly grease a 12x17 baking sheet.

Bring to a boil in a small saucepan:

1 c. butter
1 c. water
4 T. cocoa

Allow to cool for a few minutes while preparing the following mixture of dry ingredients in a large mixing bowl:

2 c. flour
2 c. granulated sugar
1/2 tsp. salt
1 t. soda

Return to the melted butter and cocoa mixture and add:

2 eggs
1/2 c. sour cream
1 tsp. vanilla

Mix well before adding this to the dry ingredients. Mix the wet and dry ingredients together just until combined well.

Pour batter into the prepared baking sheet and bake for 20 minutes.

While cake is baking, prepare frosting as follows.

Bring to a boil in a small saucepan:

1/2 c. butter
6 T. milk
4 T. cocoa

Allow to cool for a few minutes while preparing the following in a large mixing bowl:

4 c. powdered sugar
1 tsp. vanilla

Pour butter, milk and cocoa mixture into sugar and mix well. Pour over warm cake after allowing to cool for about 5 minutes. Allow entire cake to cool before serving.
Thanks for stopping by!

3.26.2009

Pineapple Upside-Down Cake and Carrot Cake

Once again, I am going to reference my old favorite cookbook, the Better Homes & Gardens Cookbook in the big red and white plaid binder. That's where I got the recipes for both my Pineapple Upside-Down Cake and Carrot Cake with Cream Cheese Frosting.

As usual, I didn't follow the recipe exactly. Again, I simplified the pineapple upside-down cake recipe by using a boxed yellow cake mix instead of making the cake from scratch. Hey, I was cooking for 100 people! I had to take a few shortcuts! Thanks for stopping by!

3.25.2009

Coconut Cake

I think the next most popular cake last Wednesday night was the Coconut Cake. This is a recipe from Paula Deen, Jamie's Coconut Cake.
I did not follow this recipe exactly. In fact, I didn't use the cake recipe at all. Instead, I used a boxed white cake mix and made two round layers. I then made the filling from the recipe and applied it to my two layers as she describes.

Finally, I made the 7 Minute Frosting. This is the first time I've ever made this frosting, and I don't think I whipped it quite long enough. It was a little softer than I would have liked, so I will keep that in mind the next time I make it. No matter though, everyone that had the coconut cake thought it was great.

Stop by tomorrow for another cake recipe. Thanks for stopping by!

3.24.2009

Peanut Butter Cake Icing

For dessert last Wednesday night, I made a variety of cakes:

  • Pineapple Upside-Down Cake
  • Coconut Cake
  • Texas Coconut Pecan Cake
  • Chocolate Cake with Peanut Butter Icing
  • Texas Sheet Cake
  • Carrot Cake with Cream Cheese Frosting


The first one to be eaten was the chocolate cake with peanut butter icing. Have you ever made peanut butter icing? It's easy. There's a recipe in the red and white plaid Better Homes & Gardens cookbook, which I reference frequently, for buttercream icing. It has a few variations listed under it, and one of them is peanut butter. You simply substitute peanut butter for the butter or shortening in the recipe. Try it with your favorite buttercream icing recipe. It's very rich, but very very good. Be sure you have a tall glass of milk ready!

Tomorrow I'll share another cake recipe. Thanks for stopping by!